
Night Hunting 101: Complete Beginner Guide
Learn how to safely hunt predators at night using multi-color hunting lights, scanning headlamps, weapon-mounted lights, thermal, night vision, tripods, calling systems, and proven nighttime stand strategies.
What is the basic night hunting setup? Use a hands-free scanning headlamp to continuously locate eyeshine, keep the weapon supported on a tripod, use a separate weapon-mounted light or legal night optic for positive identification and the shot, place the caller approximately 5–15 yards away when terrain permits, and maintain control of the wind and downwind approach.
Night hunting can be highly effective because many predators become more active, travel farther, and use open areas more confidently after dark. Reduced visibility, however, makes equipment familiarity, target identification, legal compliance, and safe stand design especially important.
Successful night hunters build a complete system rather than relying on one light or optic. Scanning, shooting support, calling, wind control, target identification, communication, and battery management must all work together.
- Check the law first: Legal hours, species, weapons, artificial lights, electronic calls, night vision, thermal optics, public land, and permit requirements vary by location.
- Detect animals before they reach the stand: Continuous scanning is one of the most important night hunting skills.
- Use separate scanning and shooting systems: A headlamp locates approaching animals while a weapon-mounted light or optic handles identification and the shot.
- Support the weapon: A tripod allows the hunter to scan with both hands free while keeping the weapon safely positioned.
- Control movement: Darkness does not prevent predators from detecting movement, noise, equipment handling, or an exposed silhouette.
- Identify every target: Never shoot based only on eyeshine, heat, size, movement, or a partial silhouette.
Do not assume that daytime predator regulations apply after dark. Species, location, light color, optics, weapons, suppressors, public-land access, and legal hours may be regulated separately.
Predators may use the same habitat after dark that they use during the day, but their willingness to cross openings, approach roads, enter fields, and move near human activity can change significantly at night.
- Coyotes: Often travel farther, use open terrain, and continue attempting to reach the downwind side of the caller.
- Foxes: Frequently use field edges, brush lines, creek bottoms, farmland, woodland edges, and other prey-rich cover.
- Bobcats: May approach slowly, remain low, stop near brush, or sit motionless while watching the sound source.
- Hogs: Often move toward food, water, wallows, feeders, crop fields, and travel corridors after dark.
- Raccoons: Commonly become active around den trees, timber, creeks, agricultural areas, and feeding routes.
- Pressured predators: May become almost entirely nocturnal and approach sounds, lights, or vehicles more cautiously.
Darkness does not eliminate wind, scent, sound, or movement. It changes how the hunter detects the animal and how much terrain can be observed at one time.
Understand Night Predator Behavior → Compare Day and Night Predator Hunting → Learn How Terrain Changes Predator Hunting → Learn How Predator Hunting Changes by Season → Learn How Pressured Coyotes Change Their Behavior → Learn How to Hunt Pressured Foxes → Learn How to Hunt Pressured Bobcats →A dependable night hunting system should allow the hunter to scan continuously, operate calls, monitor wind, identify the target, and transition into a stable shooting position without searching for equipment or making unnecessary movement.
- Scanning headlamp : Keeps both hands free and naturally points wherever the hunter looks.
- Weapon-mounted hunting light : Provides a dedicated beam for target identification and the shot.
- Multi-color hunting light : Allows the hunter to select red, green, white, or infrared illumination without changing complete light systems.
- Hunting tripod : Supports the weapon while the hunter scans, operates the call, watches the downwind side, or uses binoculars.
- Electronic predator call : Projects sound away from the hunter and minimizes calling movement.
- Mouth calls : Provide lightweight backup and subtle finishing sounds.
- Wind checker : Reveals changing wind and thermals that cannot be judged accurately in darkness.
- Backup batteries and charging equipment: Lights, optics, callers, remotes, and communication devices all depend on reliable power.
Tactical lights are commonly designed for a short, wide beam. Predator hunting generally benefits from a dedicated long-range beam that reaches farther and provides better control over distant illumination.
A multi-color hunting light gives the hunter one system that can adapt to different species, optics, visibility conditions, and stages of the hunt. This reduces the need to carry, mount, and re-zero multiple lights.
Red Light
Red is widely used for coyotes, foxes, bobcats, and general predator scanning. It preserves the hunter’s night vision well and can be less disruptive than immediately exposing an approaching animal to a bright white beam.
Green Light
Green provides strong perceived brightness and detail. It is popular for hog hunting and can also perform well in vegetation, fields, and other situations where the hunter wants additional visible contrast.
White Light
White provides natural color and strong detail for final identification, recovery, tracking, navigation, and equipment handling. It can also be effective as a primary hunting color when introduced and controlled correctly.
Infrared Light
Infrared illumination is used with compatible night vision equipment. An 850nm illuminator usually provides greater usable brightness but may display a faint visible emitter glow. A 940nm illuminator generally produces less visible glow but also provides less illumination.
Wicked Lights multi-color systems use centered emitters designed to keep the beam aligned when colors are changed. This allows the hunter to switch between red, green, white, and infrared without replacing the light or changing the established beam position.
A practical setup might use red for predator scanning, green for hogs or additional visible detail, white for recovery and final confirmation, and infrared with night vision. Actual use should always match local laws and conditions.
Learn How Multi-Color Lights Improve Night Hunting → Compare Red, Green, and White Lights → Compare Red and Green Lights for Coyotes → Learn How to Hunt Predators with White Light → Learn About Green Lights for Hog Hunting → Learn How to Choose a Night Hunting Light → Shop Multi-Color Hunting Lights →A dedicated scanning headlamp is one of the most useful tools in a complete night hunting setup. It keeps both hands free, directs the beam wherever the hunter looks, and allows continuous scanning without sweeping the firearm across the landscape.
Why Headlamps Work Well
- Natural scanning: The eyes and light follow normal head movement.
- Hands remain available: The hunter can operate the caller, remote, binoculars, tripod, or mouth call while continuing to scan.
- Wide situational awareness: A headlamp makes it easier to scan side-to-side and check the downwind side without moving the weapon.
- Reduced fatigue: The hunter does not need to hold a handheld light for the entire stand.
- Fast transition: When eyeshine is detected, the hunter can transition to the weapon-mounted light or optic while the firearm remains supported on the tripod.
Using a Headlamp with a Thermal Scope
A weapon-mounted thermal scope should not normally serve as the hunter’s only scanning system. Scanning through the scope requires moving the weapon, creates a narrow field of view, increases fatigue, and can result in unsafe firearm sweeping.
A scanning headlamp allows the hunter to continuously monitor the full stand while the firearm remains stationary on the tripod. When eye reflection or movement is detected, the hunter can move into the thermal scope for confirmation and the shot where legal.
Visible scanning light does not replace thermal detection, but it provides hands-free situational awareness around the hunter. A handheld thermal scanner is another effective option, but a headlamp remains valuable for equipment operation, close-range awareness, navigation, and detecting eyeshine outside the thermal scope’s limited field of view.
When the hunter lowers their head into a riflescope, the headlamp beam points toward the ground. Use a separate weapon-mounted light for identification and the shot when hunting with visible light.
A night stand should provide safe shooting lanes, broad scanning visibility, stable weapon support, favorable wind, and control of the likely downwind approach.
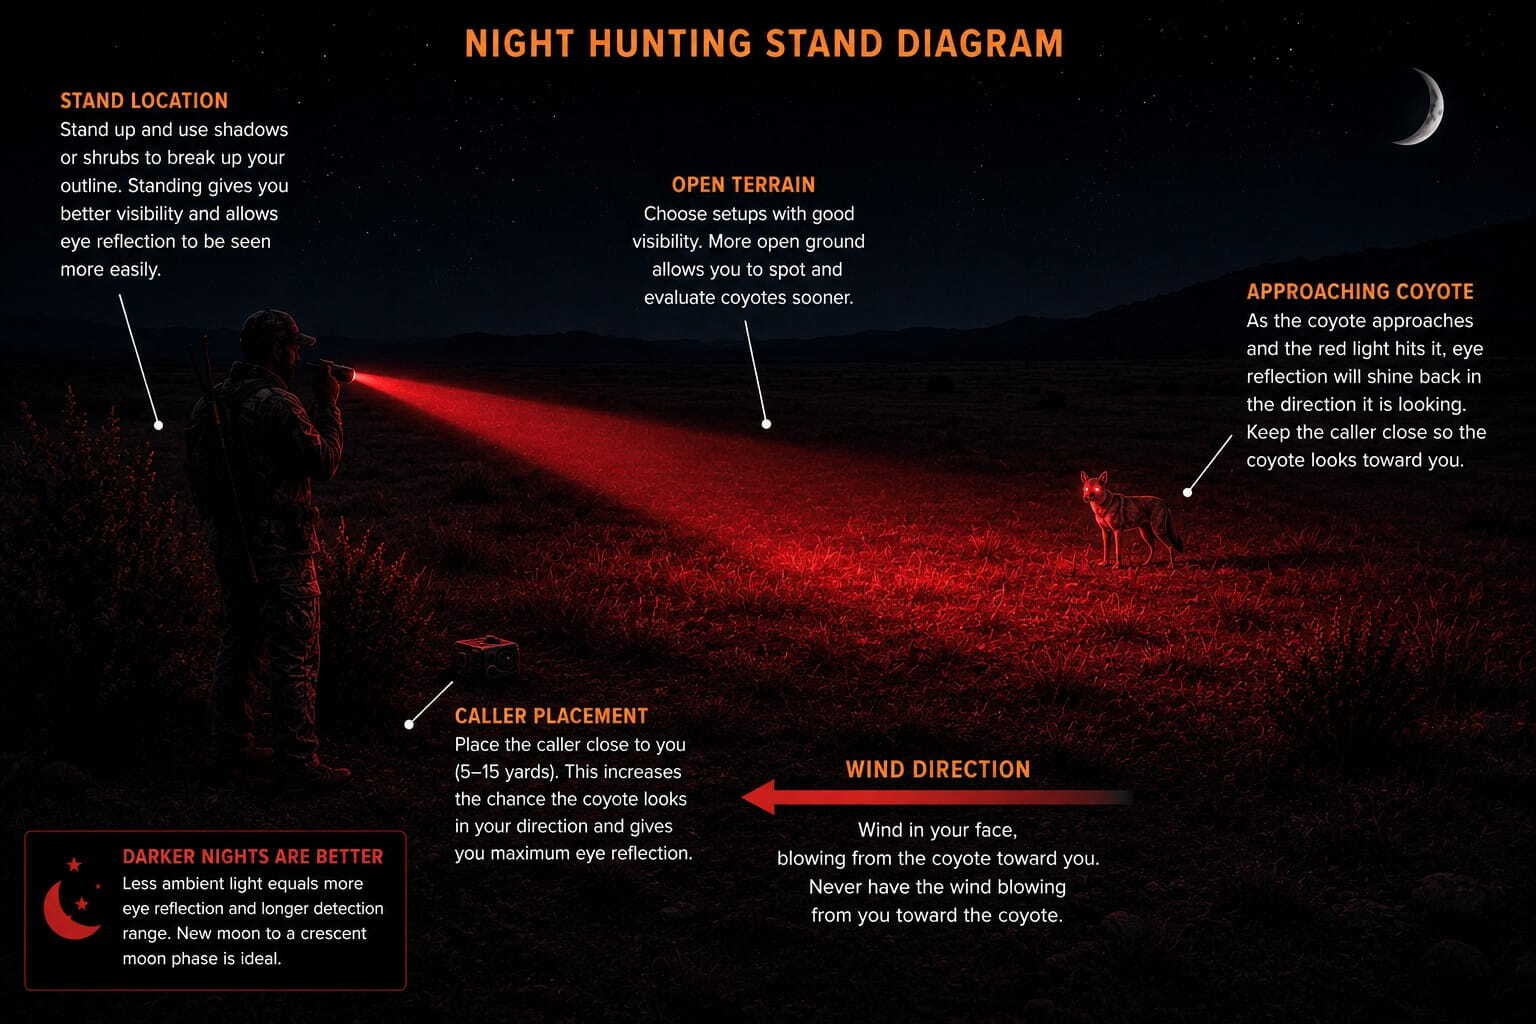
- Stand when practical: A standing position improves visibility over grass, brush, crops, and uneven terrain.
- Stand just in front of dark cover: Foliage or terrain behind the hunter helps break up the outline, but the hunter should not stand behind brush that blocks the scanning beam.
- Use a tripod: Keep the weapon supported and ready while both hands remain available for scanning and call operation.
- Keep the caller relatively close: Approximately 5–15 yards is often effective at night when terrain and safety permit. A closer caller helps keep the animal’s eyes oriented toward the scanning beam and reduces unnecessary equipment placement movement.
- Favor wind in the face or a slight crosswind: Maintain visibility of the downwind side and avoid sending scent toward the expected approach.
- Use open shooting lanes: Darkness makes partially obstructed shots and uncertain backgrounds especially dangerous.
- Pre-position equipment: Arrange the caller, tripod, remote, light controls, optics, spare batteries, and mouth calls before calling.
- Limit vehicle and entry disturbance: Avoid headlights, doors, voices, and exposed walking near the stand.
The stand must also account for wind, downwind cover, safe shooting direction, roads, livestock, buildings, other hunters, and where the predator may circle before reaching the sound.
Most animals are first detected through eyeshine rather than a visible body. The hunter must scan continuously and smoothly without losing awareness of the caller, downwind side, close cover, and other hunters.
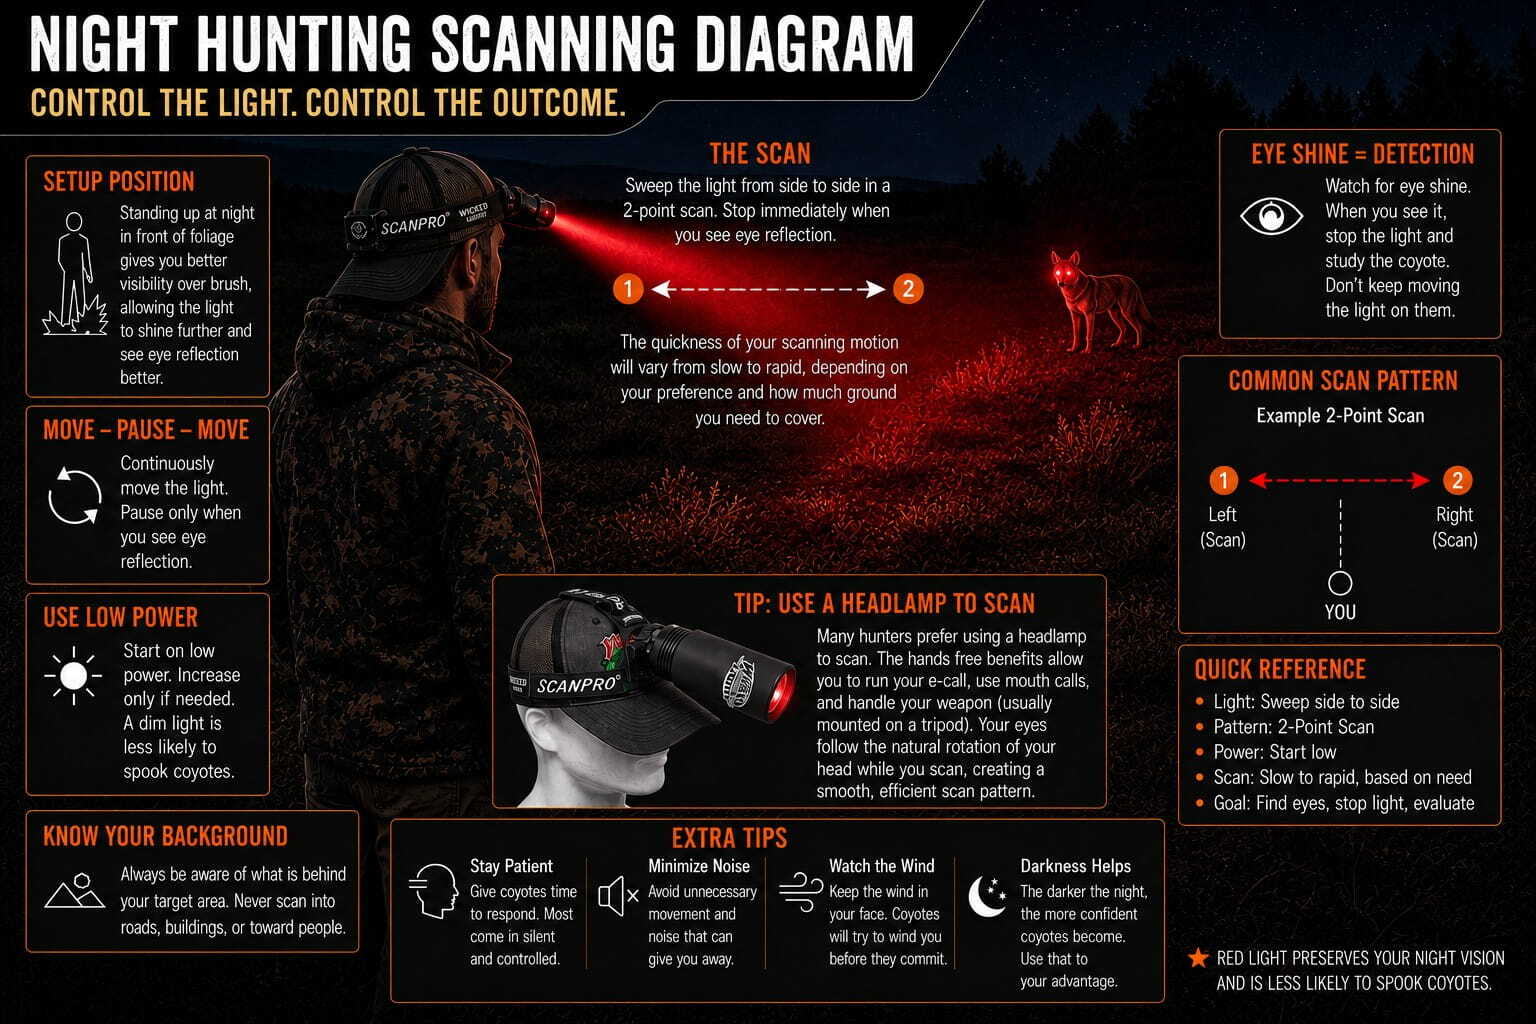
- Use a consistent side-to-side pattern: Scan from one side of the stand to the other and return without leaving large gaps.
- Keep the beam near the eyes: Hold the brightest part of the beam slightly above or near the animal during the approach rather than immediately flooding it with maximum intensity.
- Do not turn the light off repeatedly: Losing continuous illumination can allow an approaching predator to move unnoticed.
- Check the downwind side frequently: Predators may circle through a direction the hunter has already scanned.
- Watch low and high: Bobcats may remain low near cover, while predators in rolling terrain can appear above or below the expected eye level.
- Use eye spacing only as a clue: Distance, angle, vegetation, and terrain can make eyeshine appear misleading.
- Transition deliberately: Once eyes are found, maintain the scanning beam while moving smoothly to the weapon-mounted light or optic.
Use controlled side-to-side movement between the outer limits of the stand. This creates a repeatable pattern, reduces missed areas, and makes it easier to check the downwind side on every pass.
Electronic calls and mouth calls can both be effective at night. The best method depends on terrain, species, hunting pressure, equipment, and whether the hunter needs the sound positioned away from the shooting location.
Electronic Calls at Night
- Place sound away from the hunter.
- Reduce hand and head movement while calling.
- Provide multiple prey and species-specific sounds.
- Allow remote volume and sound changes.
- Pair easily with a decoy or nearby lighted observation area.
Mouth Calls at Night
- Require no batteries or remote.
- Allow immediate pitch and volume changes.
- Provide subtle finishing sounds.
- Serve as backup if electronic equipment fails.
- Reduce the amount of equipment placed away from the hunter.
Night Calling Volume
Sound often travels well in cool, calm nighttime conditions. Begin at a volume appropriate for nearby animals, then increase as wind, terrain, or calling distance requires. Strong wind and open terrain may justify more volume than sheltered fields or tight cover.
Choose sounds and presets before the stand whenever possible. Excessive attention to the remote can cause the hunter to miss eyeshine from an approaching predator.
The same light, optic, and tripod system can be adapted to multiple species, but calling sounds, terrain, scanning speed, stand duration, and expected approach behavior should match the animal being hunted.
Coyotes
Use broad scanning coverage, protect the downwind side, and expect circling behavior. Red light is a common choice, although green, white, night vision, and thermal can also be effective where legal.
Learn How to Call Coyotes at Night → Hunt Coyotes with Lights → Hunt Coyotes with Night Vision → Hunt Coyotes with Thermal → Compare Night Hunting Lights for Coyotes →Red Foxes and Gray Foxes
Foxes often respond quickly but may use field edges, creek bottoms, brush, timber, and cover differently. Maintain continuous scanning and be prepared for close approaches.
Hunt Red Foxes with Lights → Hunt Red Foxes with Night Vision → Hunt Red Foxes with Thermal → Hunt Gray Foxes with Lights → Hunt Gray Foxes with Night Vision → Hunt Gray Foxes with Thermal → Compare Night Hunting Lights for Foxes →Bobcats
Scan slowly around brush, rocks, trails, and small openings. Bobcats may remain low, move slowly, or sit motionless while observing the stand.
Compare Day and Night Bobcat Hunting → Hunt Bobcats with Lights → Hunt Bobcats with Night Vision → Hunt Bobcats with Thermal → Compare Night Hunting Lights for Bobcats →Hogs
Green light is popular for hog hunting because it provides strong visible contrast. Thermal is also widely used for detection in fields, crop edges, feeders, and travel routes where legal.
Hunt Hogs with Lights → Hunt Hogs with Night Vision → Hunt Hogs with Thermal → Compare Night Hunting Lights for Hogs →Raccoons
Scan trees, creek corridors, den areas, agricultural edges, and feeding routes. White light can be especially useful for positive identification and examining tree cover.
Read Raccoon Hunting 101 → Learn How to Call Raccoons →Hunting lights, night vision, and thermal optics solve different nighttime problems. No system is automatically best for every terrain, species, law, and budget.
Hunting Lights
- Generally the most affordable entry point.
- Excellent for detecting eyeshine.
- Provide natural detail and color with white light.
- Multi-color systems adapt to multiple uses.
- Require disciplined beam control around pressured animals.
Night Vision
- Provides recognizable detail and terrain context.
- Often benefits from a separate infrared illuminator.
- Can struggle with fog, vegetation, backlighting, or weak illumination.
- 850nm IR offers more illumination with more emitter glow.
- 940nm IR offers less visible glow with reduced illumination.
Thermal
- Excellent for detecting heat in complete darkness.
- Useful for locating animals that do not produce visible eyeshine.
- Can detect partial heat signatures near light vegetation.
- Cannot see through solid brush, trees, glass, terrain, or other barriers.
- Requires careful species and target identification.
A highly effective combination is a scanning headlamp or handheld thermal scanner for detection, a tripod-supported weapon, and a weapon-mounted thermal scope, night vision scope, or hunting light for identification and the shot.
Thermal may detect an animal quickly, while visible light or night vision may provide more recognizable detail. Build a system that supports both detection and positive identification.
Night hunting conditions affect sound travel, scent, visibility, light reflection, thermal contrast, equipment performance, and predator movement.
- Wind: Changes scent direction, call projection, tripod stability, and scanning comfort.
- Fog and humidity: Can reflect visible and infrared light back toward the hunter and reduce usable beam distance.
- Snow: Increases visible-light reflection, provides tracks, and can improve thermal contrast under some conditions.
- Rain: Can reduce visibility, sound range, equipment reliability, and willingness to remain on long stands.
- Bright moonlight: Improves natural visibility but can make exposed hunters and equipment easier to detect.
- Cloud cover: Creates darker conditions that can improve eyeshine visibility with a controlled scanning beam.
- Terrain: Brush, crops, trees, canyon walls, hills, and buildings can block light, redirect sound, or hide approaches.
- Hunting pressure: Predators may react to familiar vehicle routes, caller locations, sounds, beams, and repeated stand setups.
Wind and safe visibility generally matter more than choosing a stand solely around the moon phase.
Learn How Weather Affects Predator Hunting → Match Calling Sounds to Weather → Match Calling Sounds to Terrain → Match Calling Sounds to Hunting Pressure → Choose Calling Locations on Windy Nights → Study Advanced Pressure Adaptation →Reduced visibility can hide roads, fences, buildings, livestock, people, equipment, terrain changes, and objects behind the target. Night hunting requires stricter identification and shooting discipline than daylight conditions.
- Scout the stand in daylight: Identify roads, buildings, livestock, property lines, trails, terrain drops, fences, and shooting lanes.
- Confirm the species: Eyeshine color, spacing, body size, and thermal shape are clues, not final identification.
- Confirm what is behind the animal: Do not assume darkness means the background is empty.
- Establish partner shooting zones: Define safe directions before calling begins.
- Keep the firearm supported: A tripod reduces unnecessary movement and unsafe scanning with the weapon.
- Carry navigation and communication: Darkness can make familiar terrain difficult to recognize.
- Use backup lighting: Carry an independent white light for navigation, equipment failure, and emergencies.
- Plan recovery: Mark the animal’s location and approach carefully rather than immediately walking into dark cover.
Livestock, domestic animals, wildlife, and people can all produce reflections or heat signatures. Positive species identification and a safe background are required before any shot.
- Using the weapon scope as the only scanner: This creates fatigue, poor awareness, and unsafe firearm movement.
- Using one light for every job: A headlamp and weapon-mounted light serve different purposes.
- Sitting too low: Grass, crops, brush, and terrain can block the beam and hide eyeshine.
- Standing behind vegetation: Brush in front of the hunter reflects light and reduces beam distance.
- Turning the scanning light off: An animal can move while the hunter has lost visual contact.
- Ignoring the downwind side: Predators still attempt to scent-check the setup after dark.
- Placing the caller too far away: Long placement can create unnecessary movement and make it harder to maintain eyeshine near the sound source.
- Using maximum light intensity too early: Sudden beam changes can affect an approaching animal’s behavior.
- Watching the remote instead of scanning: Sound changes are less important than detecting the approaching predator.
- Failing to charge equipment: One weak battery can disable the entire system.
- Assuming thermal provides identification: A heat signature still requires legal and positive target confirmation.
- Skipping daylight scouting: Darkness can conceal unsafe backgrounds and access hazards.
Practice scanning, transitioning to the weapon, changing light colors, operating the remote, and adjusting the tripod in darkness before relying on the system during a live stand.
A successful night hunting setup is a coordinated system built around continuous detection, positive identification, stable shooting support, controlled light use, favorable wind, and safe decision-making.
- Verify laws before every trip.
- Scout stand locations during daylight.
- Use a dedicated hands-free scanning headlamp.
- Use a separate weapon-mounted shooting light.
- Keep the weapon supported on a tripod.
- Favor a standing setup where terrain permits.
- Use multi-color lights to adapt to species and conditions.
- Keep the caller approximately 5–15 yards away when practical.
- Scan continuously and check the downwind side.
- Do not use a weapon-mounted thermal scope as the only scanner.
- Confirm the target and background before every shot.
- Carry spare power and an independent white backup light.
Night Hunting 101 FAQ
These frequently asked questions cover scanning headlamps, multi-color lights, thermal scopes, night vision, tripods, caller placement, target identification, and night hunting laws.
A practical beginner setup includes a hands-free scanning headlamp, a separate weapon-mounted hunting light, a tripod, an electronic or mouth call, a wind checker, spare batteries, a white backup light, and access to a legal night hunting location.
A scanning headlamp keeps both hands free, points wherever the hunter looks, supports continuous side-to-side scanning, and allows the weapon to remain safely supported on a tripod.
A weapon-mounted thermal scope should not normally be the only scanning system. Scanning through it requires moving the firearm, narrows the field of view, increases fatigue, and can create unsafe firearm sweeping. Use a scanning headlamp or handheld thermal scanner for detection and reserve the weapon optic for confirmation and the shot.
Red is a popular choice for coyotes and other predators, green provides strong visible contrast and is commonly used for hogs, white provides natural detail for identification and recovery, and infrared is used with compatible night vision. A multi-color system lets the hunter select the best color for the situation.
A multi-color light allows the hunter to switch between red, green, white, and infrared without carrying or mounting several complete lights. This makes it easier to adapt to different species, optics, visibility conditions, identification needs, and recovery tasks.
Yes. A headlamp is ideal for hands-free scanning, but its beam points toward the ground when the hunter lowers their head into a riflescope. A separate weapon-mounted light provides controlled illumination for target identification and the shot.
Approximately 5–15 yards is often effective when terrain, wind, and safe shooting lanes permit. A relatively close caller reduces setup movement and can help keep an approaching animal’s eyes oriented toward the scanning beam.
Thermal is excellent for detecting heat, hunting lights are effective and affordable for locating eyeshine and providing visible detail, and night vision provides a recognizable image with infrared illumination. The best system depends on laws, terrain, species, budget, and whether the priority is detection or identification.
Standing improves visibility over brush, grass, crops, and uneven terrain. A tripod supports the weapon while the hunter scans, operates calls, monitors the wind, and transitions into a stable shooting position.
No. Regulations may control legal species, seasons, hours, weapons, lights, night vision, thermal optics, electronic calls, suppressors, permits, and public-land access. Hunters must verify current state and local rules before every trip.